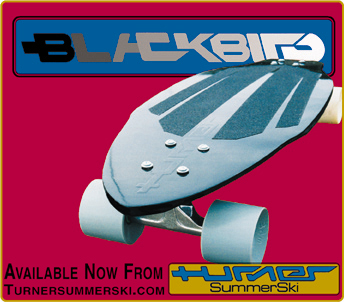
Since I've been asked by Aaron and a few other people about that "embossed" logo on the nose of my new Summer Ski, here's how it came to be. First, it is NOT a trick in Photoshop. That's part of my new Blackbird. It did not, however, come from Turner like this. I customized it myself. It was rather simple but took a bit of elbow grease to make it look decent. Here's the technique:
First, laser print the logo on some stiff card stock with a good amount of thickness. Not heavy cardboard, but something like 110-lb Index. Something that will feed through a laser printer and give you an image. How you go about getting a logo of your choice into the computer is up to you.I, of course, had several Turner logos laying around the house that were perfect for scanning and image processing.
Next, take an X-acto knife and trace on the logo to make a stencil in the card. After I did this, I "reinforced" the stencil by laminating the piece of card with some clear tape. This makes the card stiffer and a little resistant to moisture.
Ok, I got my stencil of the Turner logo. Next I cleaned the Blackbird down to bare fibreglass/epoxy without a trace of grip tape glue, dirt, fingerprints or any other contaminants. (The first thing I did when I got my Blackbird was strip off that total-coverage Turner Downhill die-cut grip tape Wes or Josh put on the board. Maybe that stuff works, but that's NOT what a SummerSki looks like!

)Then I took some 3M Adhesive Spray and sprayed the back of the stencil thoroughly without any heavy buildup. I then applied the stencil to the nose, rolled it out firmly with a heavy weight (I used a rolling pin) and made a tight seal of the stencil to the board.
Then I literally filled up the stencil with wet paint and let it dry. I used Krylon Fusion Paint for Plastic. This stuff is FABULOUS on flexible fibreglas surfaces. This is where the tape laminating came in handy. All that paint did not seep into the card and make a wet, gloppy paper/paint mess.
Once this "mound" of paint was dry (took over night,) I peeled up the stencil and VOILA! a raised logo on the nose. Only trouble is it looked kind of rough around the edges where the paint chipped when the seal was broke with the stencil and the board. That's where the elbow grease comes in: get some rubbing compound and start mellowing out that raised paint. I rubbed the logo with a soft rag and some G7 all through four quarters of football one Sunday. Got it looking RAISED AND SMOOTH.
Finally, I prepped the board again by cleaning it with a degreaser and getting a clean deck. I then spent two days patiently applying somewhere between 10 and 12 coats of even black Fusion paint. Somewhere along the line I did some more hand rubbing of the whole deck between a couple of coats. Then after all the paint had dried I took the buffing wheel and a VERY MILD buffing compound and buffed for about an hour. The board looked like a MIRROR on top. Then I did the classic Turner "pitchfork" grip tape job and waited another month for my trucks and wheels to get here.
That's how you do an embossed logo on a board. It looks decent in the picture and even better live and in person. Plus, I'm really impressed with this Fusion paint. I've put a lot of hours already on the new Blackbird and the deck still looks great. I was afraid this stuff would crack because of the flex or scratch easily because of sand and shoes. Neither is the case. Some 409 and a rag and the deck surface still looks great.
Oh, I'll write more about the Blackbird's performance this weekend. Right now it's late and I have to crash.