


First training mini-ramp in Siberia!
Thanks for Javier Navarro Camacho for the plans and support!
http://youtu.be/NJT_RXe-SAo
New modular training ramps
Moderators: Jani Soderhall, Henry Hester
-
Artem Shershnev
- Posts: 29
- Joined: Fri Aug 30, 2013 1:21 pm
- Location: Russia, Novosibirsk
-
Ricardo Damborenea
- Posts: 213
- Joined: Fri May 16, 2008 8:31 pm
- Location: Madrid
Re: New modular training ramps
willy, the guys that designed and built them could help you out with the tech details, but you'll need to speak spanish (they don't speak english). If you PM me I can put you in contact with them. Rgds
-
Curt Chapman
- Posts: 223
- Joined: Fri Aug 04, 2006 6:23 pm
- Location: UT, USA
Re: New modular training ramps
Just a funny little note about my ramp:
Took it to a slalom session a while back, and one of our new recruits started call in the ramp the "Autobot ramp".
Time to start shopping for something new to brand the ramp with:

Took it to a slalom session a while back, and one of our new recruits started call in the ramp the "Autobot ramp".
Time to start shopping for something new to brand the ramp with:
-
Curt Chapman
- Posts: 223
- Joined: Fri Aug 04, 2006 6:23 pm
- Location: UT, USA
-
Sammy Nogueira
- Sammy

- Posts: 141
- Joined: Tue Jul 10, 2007 1:10 pm
- Location: São Paulo - BRAZIL
- Contact:
Hi Curt,
This is a one amazing project, thanks for share...
We try do a one ramp.
a Brazilian Hugs
Sammy
This is a one amazing project, thanks for share...
We try do a one ramp.
a Brazilian Hugs
Sammy
Rogerio Nogueira
SAMMY
http://www.myspace.com/rogeriosammy
http://www.hardcontrol.net
CHIXILL ***** #sk8_slalom_independente
SAMMY
http://www.myspace.com/rogeriosammy
http://www.hardcontrol.net
CHIXILL ***** #sk8_slalom_independente
-
Curt Chapman
- Posts: 223
- Joined: Fri Aug 04, 2006 6:23 pm
- Location: UT, USA
Here's my finished version. All "modular".
From this:

To this:

In less than 10 minutes. Only "tools" necessary are the "C" clamps mentioned earlier in the thread, the eye-bolts that attach the pull bar assembly to the ramp, a couple of wing-bolts to hold the pull-bars together, and fingers to tighten everything up. Yes they do make the wing-bolts that I was joking aboot earlier in the thread. The only ones I could find were short though.
The "extension legs" or whatever you want to call them actually work great. It will be interesting to see if they hold up in the current configuration. Adding 45 degree braces is an option if they don't.
My GS board is currently set up with a 23" wheelbase, and there are no issues with bottoming out on the transition:

Plenty of room as you can see...
From this:
To this:
In less than 10 minutes. Only "tools" necessary are the "C" clamps mentioned earlier in the thread, the eye-bolts that attach the pull bar assembly to the ramp, a couple of wing-bolts to hold the pull-bars together, and fingers to tighten everything up. Yes they do make the wing-bolts that I was joking aboot earlier in the thread. The only ones I could find were short though.
The "extension legs" or whatever you want to call them actually work great. It will be interesting to see if they hold up in the current configuration. Adding 45 degree braces is an option if they don't.
My GS board is currently set up with a 23" wheelbase, and there are no issues with bottoming out on the transition:
Plenty of room as you can see...
-
Ricardo Damborenea
- Posts: 213
- Joined: Fri May 16, 2008 8:31 pm
- Location: Madrid


-
Curt Chapman
- Posts: 223
- Joined: Fri Aug 04, 2006 6:23 pm
- Location: UT, USA

-
Curt Chapman
- Posts: 223
- Joined: Fri Aug 04, 2006 6:23 pm
- Location: UT, USA

-
Curt Chapman
- Posts: 223
- Joined: Fri Aug 04, 2006 6:23 pm
- Location: UT, USA
Progress.....
So, I've decided to us "C" clamps to attach the ramp pieces together, and it works great.
I could use more than the two clamps shown, but it would be overkill:

And the top transition piece:

With just 3 clamps holding these three parts together, it's bombproof:

Ready for masonite:

Only tools required for assembly are the "C" clamps.
Now for the pull bars.....
(And paint eventually...)
I could use more than the two clamps shown, but it would be overkill:
And the top transition piece:
With just 3 clamps holding these three parts together, it's bombproof:
Ready for masonite:
Only tools required for assembly are the "C" clamps.
Now for the pull bars.....
(And paint eventually...)
-
willy demis
- Posts: 107
- Joined: Tue Sep 15, 2009 7:55 am
- Location: Indianapolis, IN
Thanks for the video. I am more interested in what the materials are, and where they were sourced. For example, is that just steel tubing? How did you compress the end so that another piece could slip onto it (making it two pieces)? What is the bracket that is used to hold the pull bar to the ramp, was it custom made as well?
-
Curt Chapman
- Posts: 223
- Joined: Fri Aug 04, 2006 6:23 pm
- Location: UT, USA
Yeah, it's currently at the 1000mm (or close to it) length... My wife took off with my small car and the kids for a lil' vacation without mewilly demis wrote:Looks like you were able to make it the full 1000mm length, huh?
Meh.....willy demis wrote:I took the ramp to the STL race, and everyone liked it a lot. However, some more seasoned ramp builders really disliked the harsh angle. Something to watch out for on your ramp...
If you get use to "adverse" conditions, like a "kinked" ramp, then a "more seasoned" ramp will feel all that much better, and the user of the harsh angle ramp should be able to use those skillz to really kick some booty on the "better" ramp.
Last edited by Curt Chapman on Tue Mar 15, 2011 6:05 pm, edited 5 times in total.
-
Ricardo Damborenea
- Posts: 213
- Joined: Fri May 16, 2008 8:31 pm
- Location: Madrid
-
Ricardo Damborenea
- Posts: 213
- Joined: Fri May 16, 2008 8:31 pm
- Location: Madrid
-
willy demis
- Posts: 107
- Joined: Tue Sep 15, 2009 7:55 am
- Location: Indianapolis, IN
Saw dust everywhere. Ha! That's how my garage looked too... Nice job on the ramp! Looks like you were able to make it the full 1000mm length, huh? I had to knock mine down to 970mm so that it would fit in my car. Because of it- the lower transition section was shorter. Because it was shorter, it hit the ground at a (somewhat) harsh angle.
I took the ramp to the STL race, and everyone liked it a lot. However, some more seasoned ramp builders really disliked the harsh angle. Something to watch out for on your ramp...
If you do end up with a not-so-smooth transition to the ground, then a solution would be to modify the lower transition piece as such:
1) Section off and remove a section from the tall end. As if you had a giant bandsaw and just sliced off a 3" strip from the back.
2) Get a 3" longer piece of steel, and send it through some rollers to put a curve in it. This will mellow out the transition to the ground while maintaining the overall length of the piece (so it will still fit packed up).
-
Curt Chapman
- Posts: 223
- Joined: Fri Aug 04, 2006 6:23 pm
- Location: UT, USA
+1 for me too...willy demis wrote:Ricardo- do you think you would be able to post a close-up picture of the pull handles? That seems to be the part that most people are getting tripped up on. If you could share how you did it, that would be really helpful! Thanks!
My adventure has begun...

I think I've got the pull handles figured out after Willy's and my brainstorming, just need to source them and buy them, unless Ricardo posts some photos that change my mind.
By the way, thank you Ricardo for these plans. I'm excited that if I actually make it to any races this summer, I won't lose every heat on the start ramp..
-
willy demis
- Posts: 107
- Joined: Tue Sep 15, 2009 7:55 am
- Location: Indianapolis, IN
-
Ricardo Damborenea
- Posts: 213
- Joined: Fri May 16, 2008 8:31 pm
- Location: Madrid
-
Curt Chapman
- Posts: 223
- Joined: Fri Aug 04, 2006 6:23 pm
- Location: UT, USA
Heh heh,,, Heh heh,,, You said "wing bolt".willy demis wrote:Yeah, and you could use wingnuts... May work. You could also drill a hole in the main box and install a large t-nut on the backside. Then you could weld a wing nut to the top of a bolt, and drill a hole through the steel. This would give you a "wing bolt" that could be easily inserted by hand into the main base. Hmmmm... Maybe that is what I will do!
Heh heh,,, Heh heh,

Sorry, couldn't help myself.
Screw the "wing bolts"... Just use eye bolts like you did with your clamps. Same effect, no welding...
-
willy demis
- Posts: 107
- Joined: Tue Sep 15, 2009 7:55 am
- Location: Indianapolis, IN
Yeah, and you could use wingnuts... May work. You could also drill a hole in the main box and install a large t-nut on the backside. Then you could weld a wing nut to the top of a bolt, and drill a hole through the steel. This would give you a "wing bolt" that could be easily inserted by hand into the main base. Hmmmm... Maybe that is what I will do!
-
Curt Chapman
- Posts: 223
- Joined: Fri Aug 04, 2006 6:23 pm
- Location: UT, USA
Like I mentioned, I haven't built a ramp yet, so I don't know if U-bolts will work, just throwin' ideas around. They don't necessarily have to be "wrench" tightened to work. Finger-tightened would work fine for a couple hour session before breaking the ramp back down for transport.willy demis wrote:I really like this design. But for me, the whole point was to pack it up in the trunk, take somewhere, easily assemble it, tear down, and drive home. With u clamps, I would need to carry wrench and it isn't quick. I've solved the problem of L-brackets to hold all of the ramp sections together (with the pull action clamps) so I want to have the same quickness for the pull handles as well. No u-clamps for me...
-
willy demis
- Posts: 107
- Joined: Tue Sep 15, 2009 7:55 am
- Location: Indianapolis, IN
I really like this design. But for me, the whole point was to pack it up in the trunk, take somewhere, easily assemble it, tear down, and drive home. With u clamps, I would need to carry wrench and it isn't quick. I've solved the problem of L-brackets to hold all of the ramp sections together (with the pull action clamps) so I want to have the same quickness for the pull handles as well. No u-clamps for me...
-
Curt Chapman
- Posts: 223
- Joined: Fri Aug 04, 2006 6:23 pm
- Location: UT, USA
U-bolts? (Works on full-sized ramps...)willy demis wrote:My real problem is figuring out how to attach them to the base with some sort of "quick connect." That's the part I'm having a tough time with.

C-clamps?
I think I'm going to start building one of these ramps soon. I'm thinking round tubing for the pull bars. (with an insert like you've mentioned) and U-bolts. Haven't built the ramp yet, so I have no idea if they'll work, get in the way, or.....
-
willy demis
- Posts: 107
- Joined: Tue Sep 15, 2009 7:55 am
- Location: Indianapolis, IN
At this point, the only thing I've been able to dream up is to use rectangular steel stock like this:

You could have two pieces with an insert welded into one. You could then put a pin through the other to hold them together via the insert. The rectangular steel would provide pretty good rigidity. My real problem is figuring out how to attach them to the base with some sort of "quick connect." That's the part I'm having a tough time with.
You could have two pieces with an insert welded into one. You could then put a pin through the other to hold them together via the insert. The rectangular steel would provide pretty good rigidity. My real problem is figuring out how to attach them to the base with some sort of "quick connect." That's the part I'm having a tough time with.
-
Curt Chapman
- Posts: 223
- Joined: Fri Aug 04, 2006 6:23 pm
- Location: UT, USA
Yes Ricardo, I've seen the solution you came up with...Ricardo Damborenea wrote:check this photo
http://www.flickr.com/photos/myprofe/46 ... 8/sizes/l/
I was interested in seeing if Willy had come up with a "modular" solution... Like he mentioned: "I don't want a ramp that fits in my trunk, but hand pulls that have to go on the roof rack..."
-
willy demis
- Posts: 107
- Joined: Tue Sep 15, 2009 7:55 am
- Location: Indianapolis, IN
-
Ricardo Damborenea
- Posts: 213
- Joined: Fri May 16, 2008 8:31 pm
- Location: Madrid
check this photo
http://www.flickr.com/photos/myprofe/46 ... 8/sizes/l/
http://www.flickr.com/photos/myprofe/46 ... 8/sizes/l/
-
Curt Chapman
- Posts: 223
- Joined: Fri Aug 04, 2006 6:23 pm
- Location: UT, USA
So Willy - did you figure out a solution for hand pulls yet?willy demis wrote:I do plan on putting hand pulls on it, I just haven't got that far yet. I'm also not entirely sure how I want to do it... Going to check out that photo album now to see how you guys did it. I just want to make sure that whatever solution I use can still be packed up into the small package. I don't want a ramp that fits in my trunk, but hand pulls that have to go on the roof rack...
-
willy demis
- Posts: 107
- Joined: Tue Sep 15, 2009 7:55 am
- Location: Indianapolis, IN

-
Ricardo Damborenea
- Posts: 213
- Joined: Fri May 16, 2008 8:31 pm
- Location: Madrid
-
Pat Chewning
- Pat C.

- Posts: 1400
- Joined: Mon Sep 16, 2002 2:00 am
- Location: Portland Oregon
-
willy demis
- Posts: 107
- Joined: Tue Sep 15, 2009 7:55 am
- Location: Indianapolis, IN
I made it. It's made of poplar and solves the problem of needing "curved" hardware. Primarily designed by my buddy Peter Metzger and slightly tweaked by me.Gary Saenz wrote:Willie,
What rear wedge is that you have on that deck? Haven't seen that one before.
Yes- it's very practical and smart! I'm really happy with it. I do plan on putting hand pulls on it, I just haven't got that far yet. I'm also not entirely sure how I want to do it... Going to check out that photo album now to see how you guys did it. I just want to make sure that whatever solution I use can still be packed up into the small package. I don't want a ramp that fits in my trunk, but hand pulls that have to go on the roof rack...Ricardo Damborenea wrote:Hey! They look just like ours! Good job! Aren't they practical & smart or what?
We did put a couple of bars in the ramps to get impulse (and to hold yourself). You should definetely put them.
In this album you'll find some pics of the solution
http://picasaweb.google.es/dnothink/Out ... 2874452706
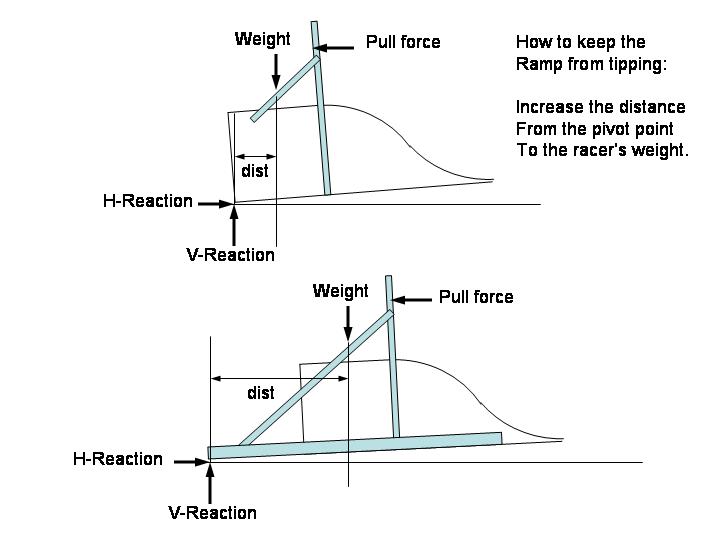
The designers are currently discussing an evolution of the handle bars to improve ramp stability.
We'll keep you posted
EDIT- Checked out the album. I didn't see the hand pull supports in the video, and I think they are probably a great addition! Did you guys bend those steel pipes yourself? I don't have access to a pipe bender big enough for stock that size.
-
Ricardo Damborenea
- Posts: 213
- Joined: Fri May 16, 2008 8:31 pm
- Location: Madrid
Hey! They look just like ours! Good job! Aren't they practical & smart or what?
We did put a couple of bars in the ramps to get impulse (and to hold yourself). You should definetely put them.
In this album you'll find some pics of the solution
http://picasaweb.google.es/dnothink/Out ... 2874452706
The designers are currently discussing an evolution of the handle bars to improve ramp stability.
We'll keep you posted
-
Gary Saenz
- Posts: 120
- Joined: Fri Sep 23, 2005 7:13 pm
- Location: Bryan, TX
- Contact:
-
willy demis
- Posts: 107
- Joined: Tue Sep 15, 2009 7:55 am
- Location: Indianapolis, IN
Pretty much finished up the ramp tonight- at least enough for a test ride. I really dig it. But it's really scary for me (I've never ridden parks or anything) to go down without hand pulls, and especially with no rear wheel stop... But I'll get that stuff.


Posted a video too of some test runs:
http://www.youtube.com/watch?v=JigBuoEFi8c
Posted a video too of some test runs:
http://www.youtube.com/watch?v=JigBuoEFi8c
-
Jonathan Harms
- JBH - ISSA Treasurer

- Posts: 890
- Joined: Wed Apr 16, 2003 2:00 am
- Location: St. Louis, MO
Yup! Thought so. When it came time to send my 1990 323 to the great parking lot in the sky in early 2008, I was chagrined to learn that I couldn't just replace it with my new dream car, the Protege5, because the P5 simply was no more and had been supplanted by the Mazda3. The 3 is a very cool car in its own way, but the Protege5 just captivated me--like a hot girl next door who smiles at you in a special way.  I ended up with a Kia Spectra5 and like it just fine, but I must confess that whenever I see a well-kept Protege5 on the road (especially a black one), I still feel a longing that borders on lust...
[/threadjack]
[/threadjack]
-
willy demis
- Posts: 107
- Joined: Tue Sep 15, 2009 7:55 am
- Location: Indianapolis, IN
Good eye JBH! It is a Protege5, and it's a bad ass car. Rather slow and underpowered, but amazingly fun to drive. Mazda has always been good about designing really great "factory" suspensions and the pro5 was no exception. I've also put lowering springs, aftermarket stiffer struts, a heavier rear swaybar, custom swaybar mounts (that make the swaybar even more efficient), and heavier endlinks all the way around. The car handles like a dream. And it's incredibly utilitarian. I've hauled 800lbs of cement in the trunk, I can fit nearly endless 8' 2x4's inside along with 2 10' 2x4's. I've hauled countless sheets of 4x8 plywood on the roof. And with all the seats out, I've hauled an entire (though admittedly compact) 5 piece sectional couch; 3 pieces inside, and two on the roof. It is a fantastic car...Jonathan Harms wrote:Off topic: Is that a Protege5? I always loved that car's styling.
-
Jonathan Harms
- JBH - ISSA Treasurer
- Posts: 890
- Joined: Wed Apr 16, 2003 2:00 am
- Location: St. Louis, MO
-
willy demis
- Posts: 107
- Joined: Tue Sep 15, 2009 7:55 am
- Location: Indianapolis, IN
Some good progress this weekend. unfortunately, I had to take a moderate hiatus to finish wiring a basement for a friend, but I was able to get most of the way complete. All I have left to do is put on the masonite layer, a steel plate on the bottom (probably gonna go to the steel supply tomorrow morning), paint, and I suppose I need to figure something out for hand pulls.
As it turns out- those clamps I bought are not of the locking variety. So as soon as pressure is on them, they just release. Not sure what I am going to do, but I am determine to find an economical, yet efficient, binding solution for all of the pieces.
I have to say thanks again to Ricardo for posting the plans. This has been a pretty fun ramp to plan and build! Enjoy the pics!


And the absolute most awesome part of the ramp- it fits in the trunk of my sub-compact hatchback!!

As it turns out- those clamps I bought are not of the locking variety.
I have to say thanks again to Ricardo for posting the plans. This has been a pretty fun ramp to plan and build! Enjoy the pics!
And the absolute most awesome part of the ramp- it fits in the trunk of my sub-compact hatchback!!
-
Wesley Tucker
- 1961-2013 (RIP)
")
- Posts: 3279
- Joined: Tue Aug 27, 2002 2:00 am
Not to change the subject but it's done like this:willy demis wrote:Off topic- How do you create a shot like that? Is it just a camera setting?
http://www.youtube.com/watch?v=HgAd5Gh7 ... 1&index=36
You need:
Camera with motor drive
tripod for perfect focus and repeatability
Adobe Photoshop

-
willy demis
- Posts: 107
- Joined: Tue Sep 15, 2009 7:55 am
- Location: Indianapolis, IN
Off topic- How do you create a shot like that? Is it just a camera setting?
On topic- The only disadvantage to the clamps I found is that they wouldn't sit recessed. So depending on their height- they might not be able to be mounted on the outside of each ramp section. Omitting the upper base piece, there shouldn't be too much issue mounting the clamps on the inside. But with the upper base, there wouldn't be room on the inside or outside due to how that piece "fits" in the "compacted" state. Other than that, though- I think they should work pretty good.
On topic- The only disadvantage to the clamps I found is that they wouldn't sit recessed. So depending on their height- they might not be able to be mounted on the outside of each ramp section. Omitting the upper base piece, there shouldn't be too much issue mounting the clamps on the inside. But with the upper base, there wouldn't be room on the inside or outside due to how that piece "fits" in the "compacted" state. Other than that, though- I think they should work pretty good.
-
Ricardo Damborenea
- Posts: 213
- Joined: Fri May 16, 2008 8:31 pm
- Location: Madrid
I think that's a great solution. I'm a disaster as a handy man, so I'll forward (with some translation into spanish ) your ideas to the real "home depot" champions, Javi & Keko. They are the men behind both the idea and the implementation. Thanks!
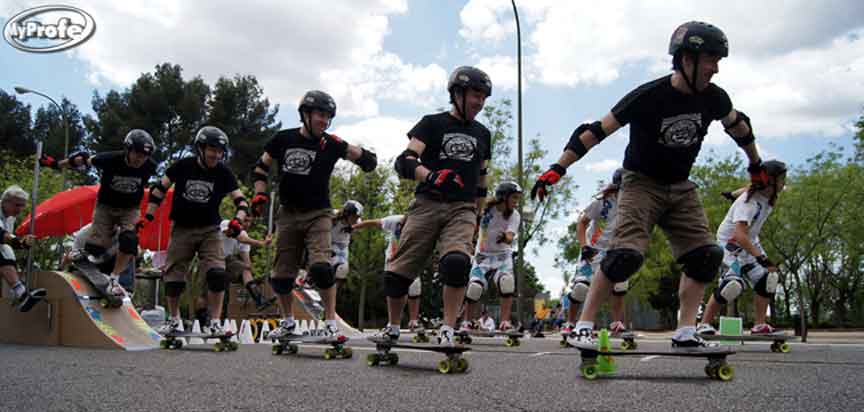
Btw: the photo shows the final run of our Outlawslalom #5. I'm the guy in front and the guy in the back is the one that beat me...by 0.1sec. 30 yrs of difference in experience between both lanes
Btw: the photo shows the final run of our Outlawslalom #5. I'm the guy in front and the guy in the back is the one that beat me...by 0.1sec. 30 yrs of difference in experience between both lanes
-
willy demis
- Posts: 107
- Joined: Tue Sep 15, 2009 7:55 am
- Location: Indianapolis, IN
Score. I just bought 10 of them for $3.50 each.
http://cgi.ebay.com/ws/eBayISAPI.dll?Vi ... EF:US:1123
http://cgi.ebay.com/ws/eBayISAPI.dll?Vi ... EF:US:1123
-
willy demis
- Posts: 107
- Joined: Tue Sep 15, 2009 7:55 am
- Location: Indianapolis, IN
That is an awesome picture, Ricardo!
...you know, what we need here is a better clamping solution to hold the parts together. While the screws and "L" brackets probably worked fine, it'd be sweet if there was a quicker, more effortless way to hold the pieces together. You know... something like... this:

But where o' where could we source something like this??? Well- thanks for asking! How about:
http://www.mcmaster.com/#pull-clamps/=6y14cj or
http://www.steelsmith.co.in/pull_action ... clamps.htm
Not cheap though. Cheapest one at McMaster is $11.84. But now that we know something like this exists, perhaps ebay would yield a better price.
...you know, what we need here is a better clamping solution to hold the parts together. While the screws and "L" brackets probably worked fine, it'd be sweet if there was a quicker, more effortless way to hold the pieces together. You know... something like... this:
But where o' where could we source something like this??? Well- thanks for asking! How about:
http://www.mcmaster.com/#pull-clamps/=6y14cj or
http://www.steelsmith.co.in/pull_action ... clamps.htm
Not cheap though. Cheapest one at McMaster is $11.84. But now that we know something like this exists, perhaps ebay would yield a better price.
-
Ricardo Damborenea
- Posts: 213
- Joined: Fri May 16, 2008 8:31 pm
- Location: Madrid
Pull bars were added to the sides. They are attached to the ramps by bolts and so are the different pieces attached together (so you need an electric screwdriver to put everything together. takes like 20min). Currently there is some discussion on how to redesign the pulling bars for riders not to "shake" the ramps (btw, "shaking" is similar to bigger ramps I've tried, so no major issue). "Shaking" currently solved as in other situtations by a fellow rider holding the ramp.
A photo to illustrate, courtesy of Myprofe (www.myprofe.com)
A little video, too
http://www.vimeo.com/11438163
A photo to illustrate, courtesy of Myprofe (www.myprofe.com)
A little video, too
http://www.vimeo.com/11438163
-
Wesley Tucker
- 1961-2013 (RIP)
- Posts: 3279
- Joined: Tue Aug 27, 2002 2:00 am
Ricardo,Ricardo Damborenea wrote:Here are the plans, courtesy of Javi
http://www.flickr.com/photos/23533001@N ... 3/sizes/l/
The mini-ramps were hard-tested yesterday by 21 riders in our Outlawslalom #5 and worked great!
Note: measures in Cm
Were pull bars added?
And how are the components fastened together?
-
willy demis
- Posts: 107
- Joined: Tue Sep 15, 2009 7:55 am
- Location: Indianapolis, IN
-
Pat Chewning
- Pat C.
- Posts: 1400
- Joined: Mon Sep 16, 2002 2:00 am
- Location: Portland Oregon
-
willy demis
- Posts: 107
- Joined: Tue Sep 15, 2009 7:55 am
- Location: Indianapolis, IN
Guys, based on the dimensions supplied, I have laid out all of the pieces on standard 4' x 8' sheets. I was really hoping to be able to get all of the cuts out of 1 sheet, but discovered that it didn't appear possible. Here's the best I could achieve. Obviously my layout did not account for the saw kerf, but I think there is just enough extra room that it won't be an issue. Enjoy!
